Showing posts with label crafting. Show all posts

Saturday, January 15, 2011

What You See is Not What You Get

It was with great eagerness this year that I packed away the Christmas decorations. I don't know what it was about them, usually I'm sad to see them go, but this year they were closing in on me. Maybe it's that they're the same every year, maybe it's that they really clutter things up (not that we aren't typically covered in clutter anyway), who knows, but they were driving me nuts and New Years Day they were gone.

So, of course, the next day my five year old came to me and wanted to know when we'd be getting the "winter decorations" out. Apparently she loves a good decorating jaunt. "We're not" sounded a bit too grumpy of an answer, so I told her we didn't have any "winter decorations" per se. Smart cookie that she is, she proposed that we make some. So we did. Well, at least one.

I did some googling and flickring to see what I could see, and finally decided that we'd make a coffee filter wreath. This fit the bill because A. I liked the looks of it B. Little people could help and C. I had the materials on hand. They are simply, coffee filters (a bunch) - we used the basket shaped - I'm not sure if the conical ones would give the same effect, hot glue and a wreath form. If you don't have a wreath form, improvise - a wreath shape cut out of cardboard or foam core would work as well.

I watched this Martha Stewart video to get the gist of it, but rest assured there's not much to "get". Simply take two coffee filters, one on top of the other, fold them in half and then make sort of an ice cream cone shape out of the half circle. Fuss with it till you've got a shape you like, and open the layers up to make it fuller.

Fold the tip of the ice cream cone up, about 1/2" and flatten that out so you have a flat area to glue to your base. I glued a row opening outwards and then glued a second row opening towards the center of the wreath (tips pointing in the opposite direction of the first row). This made the wreath nice and full and sturdy.


And there you go, our winter decoration. I stuck the bow in (which could stand to be bigger) with a T-Pin and hung it with ribbon that's also secured with T-Pins. The beauty of that - come Valentine's Day, the ribbon can turn red or pink, come Easter it can turn spring green or light blue, come fall it could be black or orange. You get the idea.

Yes, the five year old did lose interested before it was all done and yes, she did break my glue gun while sitting right next to me (it wasn't on), but she's still happy with the results and so am I. Now I've got lots of other ideas on how to vary this - coloring the filters, glittering the filters, heart shaped forms, embellishing the wreaths, etc. Goodness knows, I need a few more craft ideas for my spare time!

Sunday, December 5, 2010

Getting Down to Business


So, the word on the street is that Christmas is coming. It's not like Easter, which can fall at any time between March and April, and yet still I seem to be caught off guard. It's not because I've been sooo busy with Thanksgiving festivities or anything - I don't know what it is....I should be prepared, ready and maybe even done preparing ahead of time so that I can sit back and enjoy this time of waiting and anticipation. But I am not ready in advance. again. this year. I have made some positive strides though! (Phew!!)


This is the first of four bags I've made over the past few days, fulfilling my need to give certain people homemade gifts. I won't name names though : ) This pattern for this bag came from the Fall 2009 issue of Stitch magazine. I really love this magazine and try and pick it up with a coupon each time it comes out (otherwise it's $14.99... bit to rich for my budget). The first bag took some time, as I worked through the directions, which were very clear and easy to follow and subsequent bags have come together much more quickly. One key is cutting out all the pieces at once, before you start - that really seems to move things along. Also, there was a lot of switching threads for design purposes (and practical purposes). I found that once the first one was made, I could do all the steps that used a specific thread at once and save a good bit of switching and re-threading. My other shortcut had me skipping the use of basting spray (because I have it but can't find it...a-hem) and "basting" my batting to my bag fronts with a few dabs of clear, washable glue stick. This worked for me - please don't cuss me if it doesn't work for you though.

I bought enough of the green fabric for two bags, but now I'm using what I've got at home, so these are very cost effective bags. Even the batting I've saved from quilts that were slightly smaller than the batting I bought was just the right size for these bags, which measure about 11 1/2" wide by 14" high (with my sewing skills). And speaking of saving scraps, the bottom of this bag is the leftovers from this skirt redo. Reduce and reuse!

On the agenda for tomorrow....come up with a new banner head - one that no longer feels of fall. After all, Christmas is coming!

Sunday, November 21, 2010

Fancy Pants

I could have easily called this "weekend cleaning" as well, but I'm feeling pretty fancy about how much I tidied up this weekend. It was long over due....long, long, long. Normally I don't let people into this area of our house, but because I tidied up, I thought I'd share.

We live in a house built in 1935 with lots of quirks. We chose our house because, of all the older homes that we looked at, we thought this one would require the least amount of work. We were wrong. Take this area, for instance. It was a crudely finished attic area - no central heat or air, divided into three areas with the laundry in the hottest, darkest, dirtiest corner. Because it became clear that we really needed to rewire the entire house (like I said, we were wrong), the easiest way to do such a thing proved to be going through the floor of the upstairs. That line of thinking led the Mr. to completely gutting the upstairs. And by completely, I mean completely - no floors, no walls, nothing. I'll have to dig some of those pre-digital photos out some day.

The upstairs area is an odd shape - long and rectangular with a stairway and chimney up the middle. Not ideal, but it's worked for us. I have one side, the girls have the other for playing and the Mr. has the area past the chimney for his man cave. Theoretically we could all be up here doing our own thing, happy as clams, but in reality it doesn't seem to work that way.

Anyhow, my sewing area is the first thing you see at the top of the stairs. I scored that Hoosier Cabinet (needs a good bit of repair) for $35! It holds lots of sewing stuff. All my fabric scraps are sorted by color in the empty (and washed) kitty litter buckets under the table.

The computer is in the middle of my area. I have a kitchen cabinet in the attic that I'd eventually like hung on the wall over the monitor....for stashing more stuff, of course. At the end, before you get to the man cave, is where I have all my card making and crafty stuff. The windows are original to the house, crooked, and very drafty. Charm, it seems, comes with a price.


My final crafty nook. The large white cabinet on the left became a necessity when a wee Sarah started using my stamp pads to color the carpet. It use to have a child lock on it (and probably still should). My table top is the top to an old Ikea drafting table. I still have the legs, but the top is currently set atop a series of our old kitchen cabinets which form an L. In the cabinets...more stuff, of course! Sometimes I feel bogged down my all my crafty clutter, but then I think about people who don't create and just watch TV at night and I don't feel so bad. I'd much rather be up here getting my craft on...although sometimes I do wonder where I might squeeze a little TV in.

Thanks for taking a peek - feel free to drop by in the next two days and see for yourself. After that it will probably be a mess again and I won't let you upstairs ; )

Tuesday, August 17, 2010

And the Blue Ribbon Goes To.....


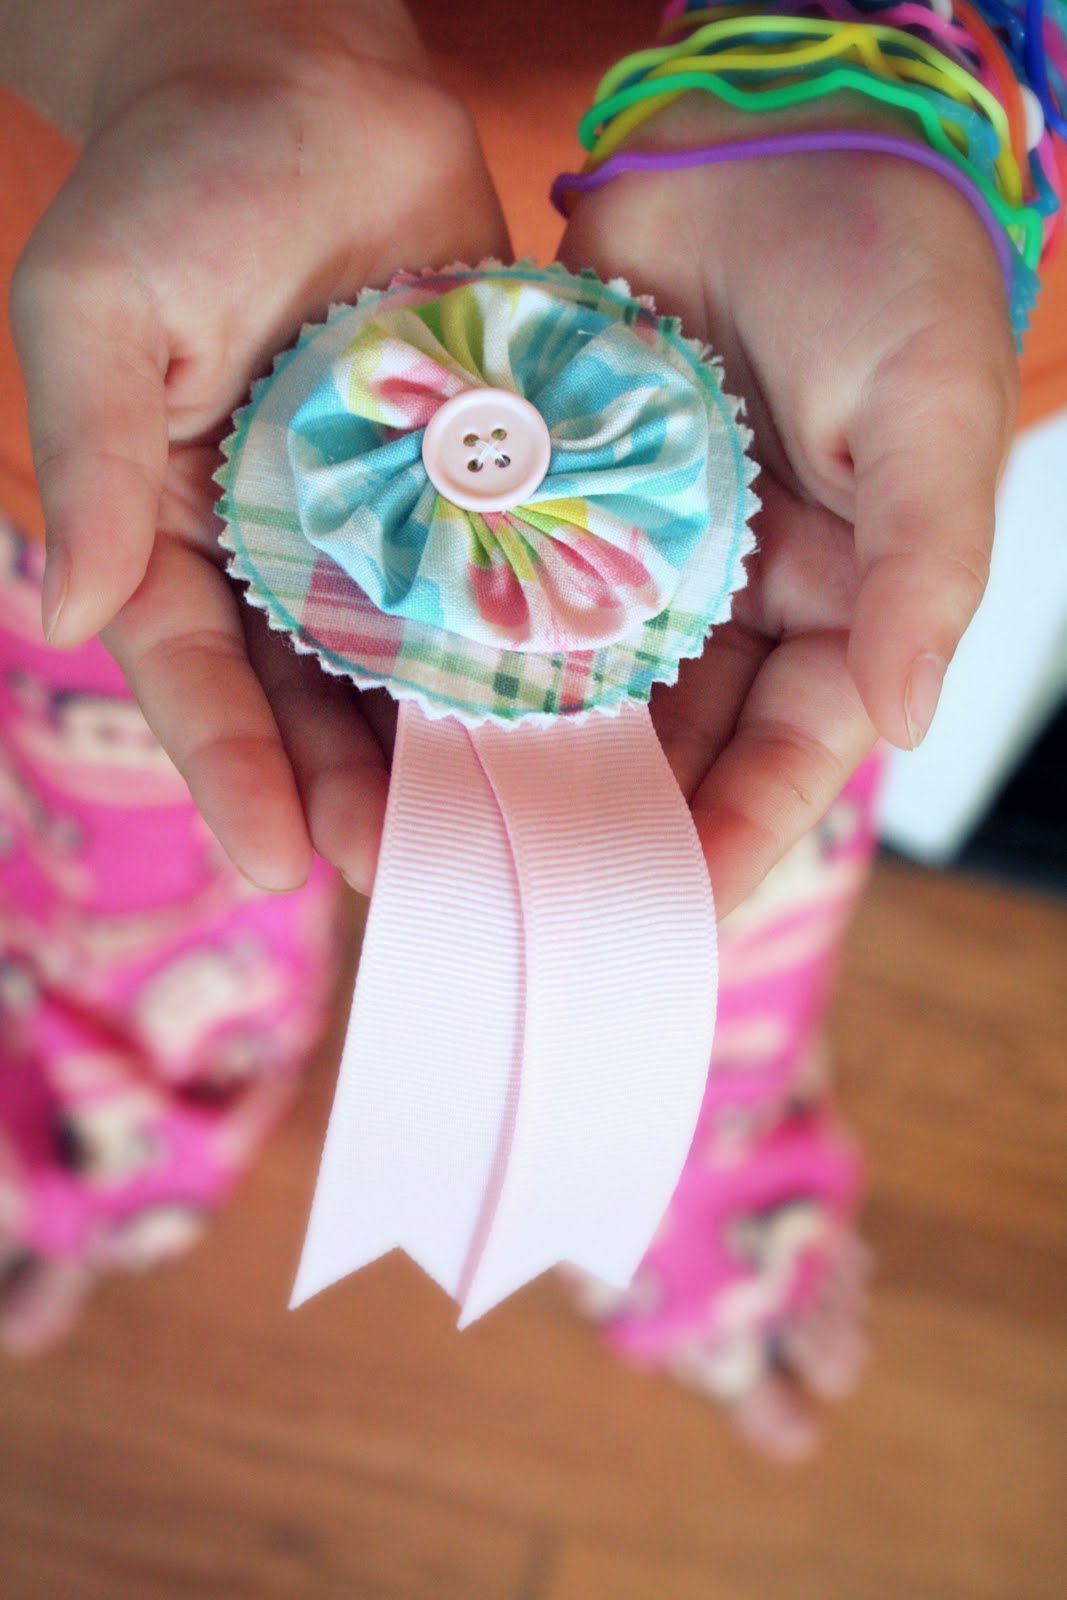
Well, the pink and blue ribbon, that is. Our neighbor's had agreed to watch the girls tonight while the Mr. and I went to a meeting at school. This afternoon, out of the blue, Sarah declared that she wanted to make a ribbon for our neighbor (age 7) to cheer her up. I am a bit unclear as to the reason why she was sad, or why that subject had come up the last time they played, but I obliged. This is what we came up with. While Sarah wanted to cut into some nicely folded yards of uncut fabric, I suggested a dig through my scrap bins (a.k.a. kitty litter buckets). Since I wasn't quite sure what her vision was, or how to execute said vision, I'm pretty happy with the results. I attached some iron-on stabilizer to the back and then sewed a pin onto it so that it can be worn. Part of Sarah's vision was to leave the blue mark-be-gone pen on it, but I had to insist it be removed - just didn't get to it before the (very) brief photo shoot. Now I've got more ideas for these and am also wondering why I haven't made more yo-yos - they're so fun!

And yes, those are flannel winter pajama bottoms on Sarah. We were out in the rain this morning and returned home damp. Apparently, now that it's in the low 90's some of us are feeling a chill.

Saturday, July 31, 2010

Craft Hope


I've talked about Craft Hope a few times before, and participated in a couple of their projects now. What an great organization this is, rallying crafters to craft for good causes. The momentum behind Craft Hope seems to be growing, as the last project was their largest yet, with over 70,000 rags being donated. Project 9 was announced this past week and I am so excited about it. They are asking for fun, colorful pillowcases for ConKerr Cancer, an organization that distributes these pillowcases to very ill children (and teens) while they are in the hospital. Just a little something to brighten their rooms and bring a smile to their face. I have so much juvenile fabric that I really didn't think I'd ever use, so Rachel and I got busy pulling pieces out of my stash right away so that I could get started. I whipped up three the first night. They are quick and easy. You can make whatever style you want (basic instructions here), just make it fun and out of 100% cotton. Craft Hope's website gives more details, as does the ConKerr site - should you be interested. After the fun we had at our rag cutting party, I am working on organizing a pillowcase party and will hopefully find a way to get the kids involved as well. Look for a link to Lark Crafts on Monday, as there will be an interview with Jade Sims of Craft Hope (her book is in stores now), and a photo from our cutting party is rumored to be showing up on the site as well.

Thursday, July 29, 2010

Stocked

Well the girls and I are back from out visit with my parents, albeit a few days later than what we had intended. My Dad gave me the scare of my life while we were at the city pool with the girls. He was feeling a little "woozy" on his way up the stairs to the water slide and while we aren't sure what all happened before people got to him, the end result was him lying on the landing unconscious in my arms for several minutes with cuts to his head and lip. He obviously fell and hit his head, but no one saw it happen. He passed out once I was with him, so I know he didn't fall and hit his head at that point, although maybe he passed out more than once. Who knows. I know that I was scared. Very scared. And I know that I am so proud of both my girls for how brave they were. I am also very grateful for the people at the pool who help him (and I) and some very kind mothers who took my girls under their wings and watched over them while panic and chaos ensued.

The end result was almost four days in the hospital, numerous tests, a heart catheterization and still no concrete answer as to why. Thankfully, he is going to participate in a clinical trial of a new medication and will be more closely monitored by doctors than if he had been sent home with no commitment to the trial.

That's not really happy talk though, is it? So instead of dwelling on that, I am excited to share you what I brought home with me from our journey. Have I mentioned how awesome the Goodwill is by my parents? Well it is. So good that I'm afraid to tell you where it is...you might beat me to the good stuff. The middle pillow case in the above photo came from there. The matching set came from their Salvation Army. The were folded and looked like they'd been stored in a box somewhere very dirty. At $2.99 for the set, I decided it was worth the gamble to see if they came clean. I've soaked them in OxiClean, mixed an OxiClean paste to cover some stubborn spots and the results are pretty good. They need a bit more spot treatment and then I'll hand wash them and I'm sure they'll be just right by then.

The above stack all came from the Goodwill, although I did have to go more than once to score them all. The top piece is a tablecloth (I think.....well, it is now), the rest are sheets. I remember my Grandma having a set like the bottom one, so I was happy to find that. I also purchased my girl's school clothes for the next two years on Saturday, when kid's clothes were on sale for 79 cents a piece. I picked up several Gap tops and jeans amongst (many) other things.


And my awesome thrifting Aunt had left a box for me at my parent's that was full of goodies. This is just a sampling. Beads, buttons, sewing notions, embroidery floss, jewelry pieces, stamps.....a little bit of everything. I am hoping that once the girls are in school, I will have some new found time to put all of my goodies to use. Right after I make the house sparkling clean and have a delicious dinner ready and waiting, of course ; )

Sunday, July 18, 2010

A Bit of This and That

I'm starting to get the crafty urge back. Something about this summer has made it hard for me to work. With the girls home, there is just no time (or peace) during the day, and at night I guess I'm just a bit too spent to start on something once they go to bed. I did manage two small projects this week though, that have me itching to keep moving forward.


I needed a gift for my girl's night out bingo game last night. Money was tight this week and I would have felt guilty spending money on a bingo gift, so I worked with what I had. I figured a jar of fresh, homemade blackberry jam would be a good place to start, but wanted to add something to it. I have been inspired by pieces of work like this one by metro-station and wanted to give something like that a go myself. I know there are others I have seen and would like to share them with you as well, but I can't seem to find them right now. So this is what I came up with, a dish towel to go with the jar of jam. I had a stash of these plain white towels that I'd picked up in Target's Dollar Zone quite a while ago (maybe around Easter ...2009 possibly) and I knew that one day they'd serve their purpose, which I think they've done quite swimmingly. I did throw in a nice bar of dark chocolate as well, so that hopefully the gift was not disappointing (can you really be disappointed if you get chocolate?).


I've also been distracted by this website, which I'd read a bit about in the Spring issue of Stitch. There is also a great Flickr pool which I would recommend checking out. Conveniently enough, I have a lot of clothes that I don't particularly love and as a bonus, I am not inclined to get rid of things very easily, which comes in very handy if you'd like to start chopping up your clothes and refashioning them. Case in point, the long linen skirt above. I love the color of the linen and the fact that it is linen, but the length was not doing it for me anymore.

I believe it was this picture of Fiona Goble's first upcycled skirt that reminded me of my own blue-gray skirt that needed a new life. I happened to have this leafy print from Ikea in my stash, which matched the color of the skirt pretty well (in certain dim light) and decided to go for it.

I chopped the skirt off a few inches above the side slits and added the decorative print band to the bottom. Then I cut one leaf out of a bit of scrap, attached it with Heat-n-Bond Lite and free motion stitched around it to ensure that it stayed put. I'm really happy with the results, but you will have to settle for the hanger modeling it, because I'm less than happy with the shape of my pudgy knees right now.

While I work on the issue of my knees (and other unsightly bits), rest assured that nothing in my closet is safe from my scissors right now.

Tuesday, June 29, 2010

Craft Hope for the Earth


We hosted a "cutting party" today and invited several of our friends from school to join us. Our school requires the kids to do at least one service project during the summer (as well as class projects during the year). I thought Craft Hope's current project, making wash rags that will be donated to several different organizations that are aiding in animal rescue and relief from the oil spill would be a timely project for the kids.


We had ten kids total and everyone brought old t-shirts, towels, sheets and fabric to cut. Many of the Mom's were happy to have an outlet for all the cast-offs that they'd been saving at home. I cut cardboard templates to the requested sizes so that the kids could trace them and then cut out the rags. When we were done cutting, the kids did a little math, sorting the rags into sets of ten.


Sharp scissors made for much easier work, we found, but regardless of the scissors, they kids had a great time working on this. In the end we had 360 rags cut with some families planning to go home and make more. We'll be sending four boxes out this week!

There were more piles on the other table, but we dared not mess up our sorted piles. We're so glad we were able to get a group together (on very short notice - my bad). When the work was done, the kids celebrated with ice cream cones. Honestly, my girls were so excited about this, you would have thought it was their birthday. Something to keep in mind when the birthday's do roll around!

Friday, May 21, 2010

Peace Out


If you want to know what seven year old little girls are into right now, at least at our school, it's peace, love and happiness. Especially when illustrated with a peace sign, heart and smiley face. They are drawn on everything. I have yet to find them drawn on my car door, the walls, or other places where drawings have previously made their way, but I'm sure it will happen. There are worse things to be digging though, I'd say. If only we could spread some of the peace, love and happiness around and share it with our younger sister when school lets out. That is neither here nor there though, but this t-shirt is here. I picked up a cute t-shirt for Rachel at the Goodwill by my parent's house at Easter that had peace, love and ice cream on it (also good). It was a hit at school and one mother lamented that she could not find any shirts with peace signs for her daughter that weren't crafted out of skulls or age appropriate. I told her to bring me a t-shirt and I'd hook her up. The above shirt is the result.


I attached the peace sign with Heat 'n Bond Lite and then stitched around the symbol to ensure that it was secured. This way, if the Heat 'n Bond starts to give, the worst that will happen is that the edges will take on a slightly frayed look, which I thought would also be cute. When I stitch on t-shirts, I always back them with freezer paper for stability - it works great. My critic told me this morning that it needed more stuff (the same critic who once told me that her "style" was "fancy"). I found this tutorial on making fabric flowers and decided to add some embellishment. I made the flower into a pin, so that if the friend doesn't share the same fancy style, she can remove it. Probably removing it for washing would be smart as well.


And while I was initially searching my shelf of fabric for just the right one, I remembered my recent thrift store scores. The fairies have kept me in mind, as I scored the above just recently. The bottom two are sheets and the top piece, which I ended up using on the shirt, is several yards of a vintage print. I love all three. I'm thinking that the bottom soft yellow floral will be the back for my sheet quilt, but that is on hold while I wrap up baby gifts. So here's wishing you a peaceful weekend full of love and happiness. We'll be busy celebrating just about every occasion worth celebrating except for a wedding - two birthday parties, a baby shower and a graduation. Busy weekend!

Thursday, May 13, 2010

And Baby Makes Four


Four for a friend's family, that is - no more babies for this family. There is a baby shower in less than two weeks for this baby. On Monday or Tuesday I said to myself, "Maybe I ought to make this baby a quilt.". I am not exactly a speedy quilter, nor do I have a lot of free time on my hands, but I decided to go for it anyway. The above picture is where I am as of today. I think I will keep it that width and add maybe two more rows to the length. It's measuring 33" x 30" as of now. The mother said that, what she really needed were boy blankets, as she already has a little girl and is set on clothes, so I think keeping this on the small side would help fit the bill for blankets as well as enable me to get it done in time. The nursery theme is sage green and brown with elephants. I have plans, if there is time, to embroider silhouettes of elephants in some of the larger blocks. The inspiration for this quilt came from Lottakind on Flickr. I loved the simplicity of it and the way it incorporated several fabrics. Of course, nothing is as simple as it seems and I think I typically end up cutting too many small pieces and doing more piecing than is necessary. Hopefully I'll be able to wrap up the piecing in the next couple of days and quilt it this weekend. Stay tuned for status updates.

Saturday, May 8, 2010

Seasonally Inappropriate


So what do you sew when the temperature reaches into the 90's? Me? Apparently I bust out the flannel and wool and get to work making a winter muff. What the heck, you say? I know, it seems odd, but there's a reason to my madness. This winter a friend's little girl was given an outfit by her grandparents that included a muff. The friend mentioned that she wish she had a muff. I was reminded of the muff pattern in the Fall 2009 issue of Stitch magazine that Erin Harris of House on Hill Road had contributed and thought I might just be able to make her wish come true. This friend's birthday was last month and I shall be seeing her for a girl's dinner out this week and wanted to be able to give it to her as a birthday gift. You know, so she can get lots of use out of it now. Or not.

Plaid had been mentioned in said fantasy muff, which I happened to have a large piece of. I was going to mimic the one in the magazine, but swap out the plaid flannel for the wool on the ends and have black velvet in the middle to echo the bands of black velvet ribbon. That was the plan until I could find no black velvet in town and even when I thought I had, I came home, cut it, sewed all the basting stitches down both sides and then decided I had dark brown on my hands. Enter plan B, which used the plaid flannel, but wool down the middle. The wool lending itself from an old suit of Jim's that had been cast away. It worked perfectly! The instructions didn't make full sense to me as I read over them, but I am much more of a learn as you go kind of gal, so I just did what they said and figured it out. And in the end, I'd say it worked out. Now I just hope I haven't spoiled the surprise and that she loves it when she receives it. I think I'll go back to the summery sheet quilt now and put the woolens away for a while.

Saturday, May 1, 2010

A Bunting Kind of Weekend


I'm back at the buntings again. Or should I say, I'm back at making birthday presents, although we shall call these belated birthday presents. These are pretty straightforward to put together, but I have found myself a little short cut and a big time saver. This week I picked up a pinking rotary blade cutter and have left the edges of these buntings pinked. Previously, I was sewing the triangles wrong sides together, turning them right side out and top stitching them. With the pinked edges, it eliminates a couple steps, one of them being my least favorite (turning all the triangles right side out).


These buntings are going to good brother and sister friends who have birthdays just a week apart (....and in April. Ahem). I was struggling with which fabrics to use for the girly one when I looked down on the floor and saw my pile of floral sheets that I've cut into for my summery quilt and realized that those would be perfect. I've opted for colors to match the boy's room and am hoping that something with your name on it will be cool enough for a now seven year old boy. I suspect my days of making him birthday gifts are just about over and done with.

My next challenge is getting these packed up and mailed off. Oh how I do not enjoy that part. In the meantime, have a lovely rest of your weekend. I think we're going to be a bit soggy here tomorrow. A good reason to spend the afternoon inside with the family.

Saturday, April 17, 2010

Bingo!

Have I mentioned that I play bingo? Now stop your laughing and hear me out..... A group of friends, who all happen to have motherhood in common, have gotten together for two, maybe three years now to play bingo one Saturday night a month. Sometimes we lapse, we don't always all make it, but it is good fun. We all bring a wrapped $10 gift to serve as a prize for winning a game, we have a potluck dinner and eat really good food, have really good drinks, pause for dessert and then we play a "blackout" round and the first person to cover a board wins the "kitty" into which we've all put $5. Are you laughing so much now? Are you still laughing when I tell you that last month I went home with gardening gloves, a gardening tool, and hand thrown pot made by one of the mommas, and $45? No, I didn't think so.

So bingo was tonight. At 2:30 this afternoon I still did not have my gift and was planning to run into Target on my way and pick something up. But that felt like I wouldn't be putting much thought into it and really, I've been so stoked about the pot I won last month that was hand made. So....I had these blocks already made (minus the muslin sashing) and thought I could put them to use. They're rejects from the quilt I was making for the Mister and me that I am not feeling the love on. On their own though, I thought they'd make dandy potholders and so that's what I did with them. I added the sash, sewed them right sides together with a layer of cotton batting and insul-bright in there, turned them right side out and closed the seam and then quilted in a square spiral, following the block's pattern.

I think they turned out kind of cute. I kind of wanted to keep them for myself. I think they were well received.....hopefully pot holders are not a totally lame gift to go home with. Thank you for not saying it, if they are.

Friday, April 16, 2010

The Weekend


It may not look like it, but we've got a busy weekend ahead of us. Lots of friends and getting together, so it will be fun, but busy. Taking some quiet time tonight to sew the binding on another Ticker Tape Quilt this evening. This one is a gift for Sarah's preschool teacher who will be having her first baby this summer. I'll share the final results once it's done.
Happy weekend!

Monday, April 12, 2010

Faith in Fairies


I've done it. I've done what I've had a really hard time getting myself to do. I've gone and started cutting up my awesome floral sheet collection. As soon as I cut into my favorite, I had this horrible thought that I may never find an awesome old sheet for $1.39 ever again. It was not a good feeling. My trip to the thrift store this morning did nothing to allay my fears, as I left empty handed. Still, I have to have faith that the floral sheet fairies will not turn their backs on me and will continue to throw little treasures my way.

So what's a girl to do? Get on with making herself something pretty then, I guess. Five squares into the quilt that was to be fabulous and beautiful and for the Mister and me, I stopped loving it. Actually, I haven't loved it at all. That's been a road block for me the past month (or longer) - I want it to be done and wonderful and nothing about what I'm doing makes me think it will be that. So for now I am going to work with 2.5" squares and make some 9 square blocks with white centers, sash the blocks in white and whip me up some old sheet loveliness. It seems like just the sort of task I need right now. Fingers crossed that I keep on loving it because if I don't, I've going to be crying over a bunch of sheets that are no longer suitable for beds.

Tuesday, February 23, 2010

It's Been a While


I'm still here. Just scrambling to stay afloat at the moment. The upside of having two bad head aches back to back was that I got to listen to a lot of the Olympics that I would have otherwise missed. The downside was losing over two days to the head aches. Bah. They are gone now and I have been caffeine free for four whole days in an attempt to eliminate one possible contributing factor (since the family can't be eliminated). I have to say I continue to feel just a pillow away from a nap at any given time, but I'm making it. Yay.

The above are my parent's birthday presents. I can say that because odds are they will not come across this in the next few days. I am always and continually at a loss as to what to give them and have been trying to make things that I feel they would appreciate - not like the square mug I made them once....or the mug that said "B'S" because our last name started with B. Apparently my Mom took that one another way. Oops. Their birthdays have come and gone but we will be seeing them this weekend and I like to save on postage, simple enough.


I started with layering paper and tissues on top of a piece of muslin covered in diluted white glue. I just spread more glue over everything as I added layers. I have seen this done on Quilting Arts TV more than once, but here is the link to the tutorial from the most recent encounter I had with the idea. You may have to register to be able to see it, so for reference it's project 409-2 that I used as my starting point. I didn't turn mine into vegetable shaped pillows though. Once I had my paper base I did some stamping on top and then added silhouettes of both of my girls that I cut out of black card stock. Getting their silhouettes was really easy. I took a picture of them standing against a wall in profile then uploaded it to picnik where I scaled it to the actual size I wanted it and then traced it right off the monitor onto a piece of white paper which I used as my template for the final cut out. Adjusting the exposure also helped to be able to see the silhouette a bit better. And let me say that the pictures were in no way fussy. I believe neither had had their hair brushed, they were in their pajamas and it was just point and click. I would show you how un-fussy they were, but really, they are not even shareable.

So now it's time to clean the house, as my parent's haven't been to visit in a year now and we have a whole new kitchen to show off. Last time they were here we didn't have a kitchen, so we've greatly improved what we have to offer guests! We'll also be celebrating both their birthdays as well as the girl's, as Sarah's will be here in a week. There'll be a whole lot of aging going on this weekend....just glad it won't be me doing it ; )

Sunday, February 14, 2010

Happy Valentine's Day


We had more snow on Friday - about an inch and a half. Even flurries are a big deal here, so anything that sticks on the ground is pretty life altering. And the abundance of snow here this winter has definitely been life altering for us. We have spent so much time outside playing in the cold, which we would normally not be so game for and I have spent what seems like a life altering amount of time washing and drying wet clothes! Lots of good fun.


This is the Valentine I made for the girls (I made two - I'm no fool). I sewed several strips of 1" wide and pink fabric together to get a new fabric to cut the hearts out of, then sewed it to the pink polka-dot fabric. I embroidered "love" on that and then glued it to a piece of paper that says "I love you" and glued that down to a larger piece of pink card stock. What was probably the most fun was the tiny little heart stamp I created by carving it out of a pencil eraser. It worked! Always a good feeling. They were well received, but there was also a request for something more. I think my kids have become too accustomed to always getting "things". They don't even really care about the "thing" - just that they got it. My head is going topsy turvy trying to think of how to stop this now, at almost 5 and 7 and not let it get any further out of hand. Any suggestions? We're already thinking that the Easter Bunny is going to appear very scroogish this year. But for now, Happy Valentine's Day.


Wednesday, February 10, 2010

Hearts, Hugs and Kisses


The sewing machine has been busy, but there isn't much to show for it as of now. Hopefully a little something before Sunday though. I did get these Valentine's finished up last night though and in the mail to family today. The girls and I used our thumb prints to make hearts - easy peasy and fast. Maybe next time though, not the thumb - it was hard for them to twist it and get it on the paper. A pointer finger would probably be better. I used watercolor paper for the thumb prints, which gave a nice texture. I was happy with that call.

I am not loving the quilt I have started for us, which was hiding under the pin cushion I made last week, by the way. I think I may abandon ship and find a new boat to sail on, so to speak. I think maybe a different color combination may be in order as well. Who knows. We shall see, time will tell and ahoy matey. Have a great day!

Monday, January 18, 2010

Haiti

Haiti has been near and dear to the hearts of many people that I know for several years now. These photos were taken by my husband in Haiti about five years ago now. It's easy to remember when he went, as I was home pregnant with Sarah. He spent a week there with the Children's Nutrition Program (CNP), which works to fight malnutrition in Haiti. They have an incredible program called Hearth, which you can read more about on their website.


I have another friend who traveled to there a couple of years ago with The Cotting School, (which helps students with physical, learning and communication needs) where he works, to work with their sister schools in Haiti through Hearts with Haiti. And I have yet another friend who traveled there just last January with a church group to help with some building projects.

I have not talked anyone who has returned from a trip to Haiti that has not been moved by the spirit of the people there. In the face of constant adversity they persevere, laugh, love, smile and praise God. The news reports coming out of Haiti have shown this spirit, as even, without a church left standing in Port au Prince, people still gathered to sing, pray and worship.


So what do we do? I love this option from the American Red Cross - just text "Haiti" to 90999 and a $10 donation will be made to the American Red Cross and added to your bill. The organizations I mentioned above all have links and take donations as well. And here's one that makes me excited as well. Craft Hope has set up an etsy shop that is being filled day and night with donations from the crafting community. You can either shop within their store or donate something to be sold. All of the profits are going directly to Doctors Without Borders . I have donated the above set of seven note cards and am hoping to get a few more things made and ready to donate. You can get information on how to donate items via the Craft Hope website. They have already raised over $8,000!

So if you're still contemplating what you can do, hopefully one of the above links will speak to you.

Saturday, January 2, 2010

Happy New Year!


Just wanted to pop in and wish you a Happy New Year ( a day late...apparently there is one resolution I am damned to fail at every year). We are off to a good start celebrating with family and friends, sleeping in and just hanging out at home. We're off to a birthday party now and will deliver this bunting, which has the recipient's name on the other side. Lots of crafting planned for the new year with a goal of making at least one quilt more than last year, although I don't currently know what that number would be...at least five or six. I'm already anticipating the arrival of three new babies (not mine!!), so I'll be well on my way. I hope your new year is filled with the things that make you happy as well.